Vista 26p shower skylight

The friendliest place on the web for anyone with an RV or an interest in RVing!
If you have answers, please help by responding to the unanswered posts.

travellerz71

Well-known member
Joined
Oct 20, 2011
Posts
59
Location
SC
I am replacing the outer part of the skylight it has 4 trim corner pieces with 3 screws each. There are no screws on either of the long sides. Would it hurt to put screws on the sides and the ends and not use the trim pieces? I left out the part where I paid a rv repair to put the new one in. I am going to put butyl tape down under the skylight. They left the old sealer that was too hard to remove under the skylight and did not try to seal under it. They put Dicor self leveling on the outside over top of the old caulking that looks like silicone and of course it did not seal. Sorry for the rambling it is frustrating to pay someone and have to repair it myself.
 
What sort of skylight is this? A brand name and (photos would be a great help! Is it one of the opening (vent) types or a permanent bubble? Standard vent types fit a 14x14 open but non-opening types can be much larger and odd shapes. I've not seen one with the corner pieces you described, but in 25+ years of RVing I've learned that anything is possible.

There is no getting around removing & cleaning enough of the old sealant to get firm adhesion and a watertite seal. That appears to be the man problem with the previous install. I can't think of any reason you could not add more screws along the sides, but why would you leave the corner trim off? How does that help anything? But yes, you could probably leave them off and simply fill the end gaps with more sealant.
It is a permanent bubble over the shower. The corner brackets have a Winnebago part number 138372-01-CHT Trim-Corner, Skylight. If I leave them out I will drill holes in the skylight where they were mounted.
 
OK, got it. But what's the advantage of leaving the corners off? The important part of the job is proper prep work; once that is done the corners should be easy enough to install. with or without the extra screws on the sides.
 
The bubble will either crack when you drill it, or when you run the screws down. If you are lucky and don't crack it, it will later as its expansion and contraction due to heating and cooling will put it in contact with the screws, and then crack it. I suspect WBO used the corner pieces to hold it down and allow it to walk around on a bed off sealant.

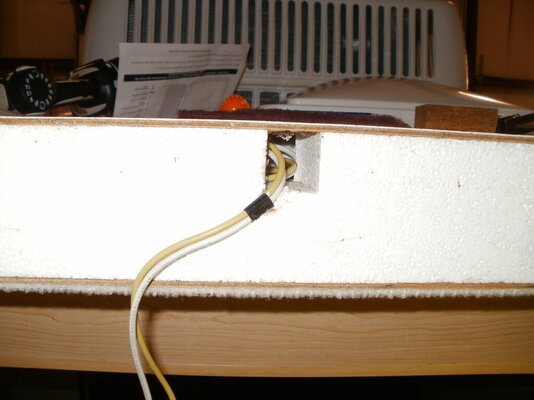
Be careful, that roof is 3/16 or less thick luan plywood under the fiberglass sheet, and under the plywood its styrofoam. Run the screws in gently and preferably tighten by hand.
Pic is cross section of the roof at the fantastic fan on my '07 View.

Charles

IBi7PVODIr.pngImage078.jpg
 
Last edited:
Sounds like another RV repair hack job. I replaced one of the roof vents on our previous Horizon and it took quite a bit of time to clean the roof surface as prep for the new vent. Good prep is like 99% of the job.

Butyl tape is a very good adhesive for your window frames, that is until you try to pull one out (been there.) I chose not to use any sealing tape for the vent frame to roof joint; self leveling sealant (aka Dicor) is my first choice, once you lay a bead down on the roof and/or frame you can reposition the part until it's correct. Then a few stainless steel truss head (larger head diameter) fasteners to hold the part in place while the Dicor cures. Then as usual Dicor is applied around the perimeter.

The fasteners basically just hold the part in place until it cures. Some might not believe that Dicor by itself is adequate for this job but I have quite a bit of first hand experience using it and being amazed at its adhesive properties.
 
I replaced my cracked shower skylight a couple months ago. The original had the corner pieces, and holes along the flanges as well. It had that rubbery silicone stuff underneath as well as along the edges which maintained perfect seal integrity, but the exposed surfaces had become brittle and were cracking. The supplier of the new skylight specifically instructed to drill holes along the edges which I made for #10x3/4" screws (what was there). No hole spacing was specified but I used about 3-1/2". I had no issues drilling the lexan (I think that's what it is), drilling gently minimizes the grabbing once it pokes through and not one crack. I removed all traces of old sealant from the roof surface. Started with lightly scraping with a dull putty knife then finished with gentle scrubbing with scotchbrite and mineral spirits. It came out perfectly clean. The skylight supplier specified Surebond SB-140 under the flange, along the edges and over the screws, so that's what I used. It all went by the numbers, I secured the skylight by the corners "dry" so I could drill pilot holes for all the screws, I put the bead of sealant down, placed the skylight and secured the screws incrementally until sealant started to come out along the edge. Added another bead along the edge and over the screw heads. I suspect this will last the remaining life of the RV.

Mark B.
Albuquerque, NM
 
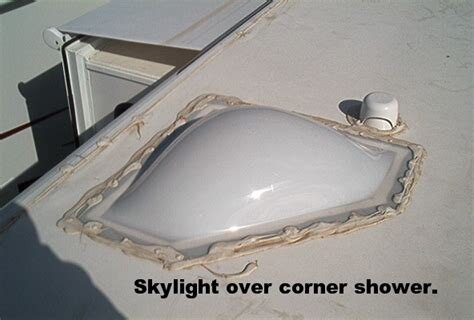
My shower skylight dome is 2 parts, lower dome, upper/outer dome. The outer dome has no holding corners, just 5 screws on each side. The edges are covered with a thick layer of Dicor that extends onto the roof 2".
I hope I never have to replace it the outer dome is $380. This is a stock picture, not mine.
1713060651954.jpeg
 
My shower skylight dome is 2 parts, lower dome, upper/outer dome. The outer dome has no holding corners, just 5 screws on each side. The edges are covered with a thick layer of Dicor that extends onto the roof 2".
I hope I never have to replace it the outer dome is $380. This is a stock picture, not mine.
View attachment 172325
That's exactly what the skylight looked like on our Horizon. Before we sold it I completely refurbished all sealant on the roof and sidewall to roof joint. Some of the Dicor was beginning to separate from the surface of parts in random areas so that was easy to remove. Some was still firmly attached so a razor was called for.


..... I had no issues drilling the lexan (I think that's what it is), drilling gently minimizes the grabbing once it pokes through and not one crack. ....

Mark B.
Albuquerque, NM
Good job Mark. Lexan is a trade name for polycarbonate. Has high impact resistance but prone to scratching. On our sailboat I replaced all of the porthole 'windows' with polycarbonate that I had cut to size. I'm guessing Lexan isn't typically used on RVs but that's just my conjecture.

If anybody cares, the process when I replaced the 'windows' on the boat was to apply a bead of sealant (sorry but I forgot the kind of sealant I used, probably an RTV) around the opening. You let that cure for a few minutes creating sort of a gasket then the 'window' is placed in position and screwed down.

The Lexan was pre-drilled for the screws about every six inches, the hole is large enough so the screw does not come in contact with the Lexan.
 
Back
Top Bottom