SargeW
Site Team
Sometimes the simple mods can make a huge difference. Being from the desert S/W the temps can go from frigid to smoking hot overnight. One of the mods we knew we wanted to get before any serious travel were shade awnings over the drivers side windows.
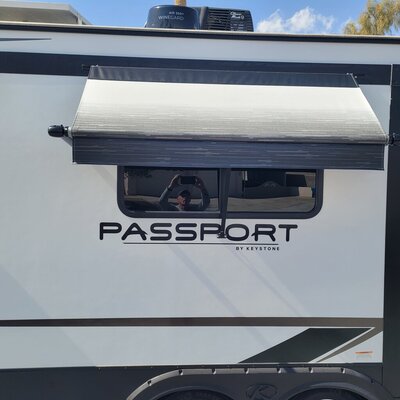
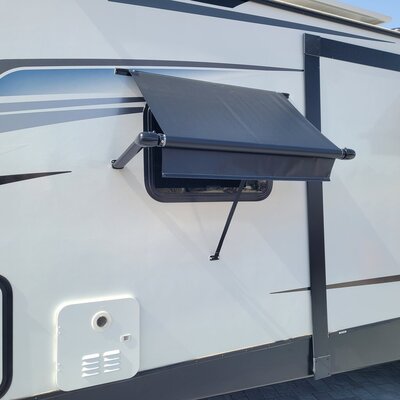
We had two major windows we wanted to shade. A 5.5' window over the theater seating in the slide out, and an "emergency exit" 32" window in the bedroom. Both awning were from "Carefree" and purchased on Amazon for just under $500 for both. Awnings came with our choice of vinyl colors, pre installed on the roller tubes, side supports, and mounting hardware. They arrived in 2 days.
The instructions are straight forward and pretty easy to follow. My only deviation was that the awing on the slide had to be raised above the roof of the slide. The instructions say to install the awnings at least 3" from the top of the window to allow for mounting hardware and the roller tube when the awning is closed. I really didn't notice when I measured the windows before ordering them because the slide out has a 4" metal trim around it that the slide roof is only about 1 1/2" over the window. We ordered them a little longer than the windows to allow for some extra coverage when the sun was not directly overhead.

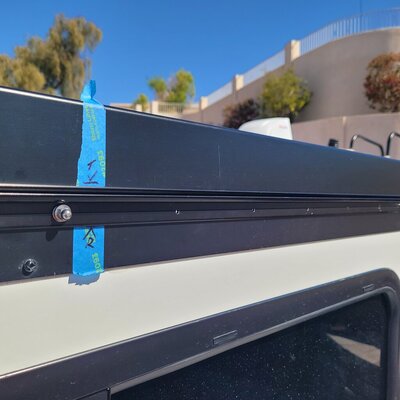
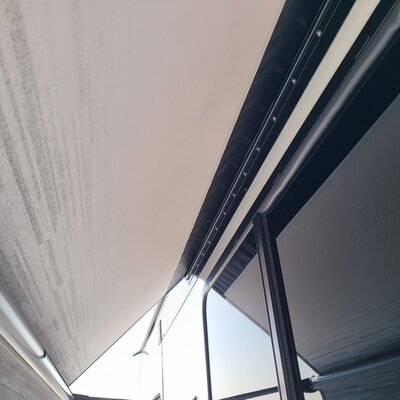
When starting the install a check of the trim piece showed that the trim is very securely attached (thank you Keystone) to the entire perimeter of the slide with screws every 5" or so. I measure up on the trim piece just far enough that the mounting molding would sit above the slide out roof and the fasteners would not touch any part of the roof surface.
The awnings come with 1 1/2" self tapping screws (lots of them) that would normally secure the awning mounting strip to the side of the RV. These would not suffice for this mount as just beyond the inside of the awning mount strip is the rubber slide seals for the slide out. I sourced 16 stainless 3/4" bolts, washers, and acorn nuts, and lock washers from Lowes. Total for the new stainless hardware was about $20.

I carefully measured and marked the awing rail on the slide out trim and used a couple of clamps to hold them steady while I drilled the new holes for the stainless hardware. The trim drilled easily and all 16 new bolts and hardware installed. Mounting the awning arms and hold down were fairly simple and I used butyl tape behind all mount plates. After the arms are secure you pull two cotter pins from the roller tube and the return spring is activated.
The install is done, and the new awnings work wonderfully, and the shade they provide allow having the windows wide open on nice days. The second awning mounted above the window on the side of the RV as normal. Well worth the money and time.


We had two major windows we wanted to shade. A 5.5' window over the theater seating in the slide out, and an "emergency exit" 32" window in the bedroom. Both awning were from "Carefree" and purchased on Amazon for just under $500 for both. Awnings came with our choice of vinyl colors, pre installed on the roller tubes, side supports, and mounting hardware. They arrived in 2 days.
The instructions are straight forward and pretty easy to follow. My only deviation was that the awing on the slide had to be raised above the roof of the slide. The instructions say to install the awnings at least 3" from the top of the window to allow for mounting hardware and the roller tube when the awning is closed. I really didn't notice when I measured the windows before ordering them because the slide out has a 4" metal trim around it that the slide roof is only about 1 1/2" over the window. We ordered them a little longer than the windows to allow for some extra coverage when the sun was not directly overhead.

When starting the install a check of the trim piece showed that the trim is very securely attached (thank you Keystone) to the entire perimeter of the slide with screws every 5" or so. I measure up on the trim piece just far enough that the mounting molding would sit above the slide out roof and the fasteners would not touch any part of the roof surface.
The awnings come with 1 1/2" self tapping screws (lots of them) that would normally secure the awning mounting strip to the side of the RV. These would not suffice for this mount as just beyond the inside of the awning mount strip is the rubber slide seals for the slide out. I sourced 16 stainless 3/4" bolts, washers, and acorn nuts, and lock washers from Lowes. Total for the new stainless hardware was about $20.

I carefully measured and marked the awing rail on the slide out trim and used a couple of clamps to hold them steady while I drilled the new holes for the stainless hardware. The trim drilled easily and all 16 new bolts and hardware installed. Mounting the awning arms and hold down were fairly simple and I used butyl tape behind all mount plates. After the arms are secure you pull two cotter pins from the roller tube and the return spring is activated.
The install is done, and the new awnings work wonderfully, and the shade they provide allow having the windows wide open on nice days. The second awning mounted above the window on the side of the RV as normal. Well worth the money and time.


